Tuesday, January 4, 2011

My First Hoo are You? Post!

Link up and join the fun!
nightowlcrafting.blogspot.com.jpg

1. Did you make any New Year's Revolutions?
I did not.    I've never really been one to do that.
2. What are some goals you have for 2011?
I do want to do better at planning meals, cleaning my house regularly, drinking 8 glasses of water a day, exercising and crafting more.  I need to learn how to use my cricut!
3. What is something that you got for Christmas?
My parents gave me a gift card to Kohls which I've already spent! :)  My mother also gave me a pincushion that my grandmother made years ago from a tuna can that looks like a chair that I will treasure.  I got 2 new perfumes and 4 new Yankee candles!
4. Did you see any good movies over the holiday season? 
We never go to the movies but I do get them from the library.  We watched Date Night.  It was really funny.
5. Do you do your own taxes or have someone do them for you?
My husband does them and waits till the last minute which makes for some stressful days.   I tried to organize all the files this summer so it will be easier to actually find the paper he needs....  We will see how it goes this year.


Monday, January 3, 2011

SEW Wall Art


Are you sensing a theme here? :) Here is another gift I made for my daughter for Christmas.

I am trying to remember if I bought the letters at JoAnn's or Michael's. I bought letters at both stores and then decided I liked these better so I returned the other set. The backs of these have the hole for hanging. They were already painted white so I didn't even have to paint them! I have to tell you that I am not a scrapbook-er but I LOVE scrapbook paper. I think it could become a problem for me. I found this paper at Michaels. The flowers were a pack in the scrapbook isle I found at JoAnn's.

Supplies:
  • Letters
  • Scrapbook paper
  • Modge Podge
  • Brayer
  • Flowers or whatever you want to add. I tried making some fabric flowers but didn't like it so much and since the patterns on the paper were a bit 'busy' decided the flowers were a better choice. I added buttons to the centers of each flower.
Here is something similar.

Directions:
1. Place the letter on top of the paper and trace all around.
2. Cut the letter out of the paper, cutting on the inside of the pencil line.
3. Using a brush cover top/front of letter with Modge Podge.
4. Brush back of paper with Modge Podge.
5. Place on top of letter and use the brayer to get it smooth.
6. Let dry.
7. Brush another layer of Modge Podge on top and sides.
8. Decorate as desired.

That's it!

Enjoy!


Saturday, January 1, 2011

Sewing Ham and Roll


Here is another gift I made for my daughter Jocelyn. I made her a super huge sewing ham and a sewing roll. I did find a pattern at JoAnn's but wasn't loving the shape so I made my own version. It is supposed to have wool on one side and cotton on the other. I wasn't crazy about any of the wool I found at JoAnn's so I went to the thrift store and found a cute wool skirt for $3.00 that had purples and oranges in it. I bought coordinating cotton fabric for the back. When I was researching sewing hams every site I found said they were either stuffed with saw dust or wool scraps. I decided to go with saw dust but wasn't sure how I was going to get enough for both of them. I called a local lumber yard and asked if I could buy some from them. When I got there with my bucket they were kind enough to fill it for me for free! So nice!


Directions:
1. Make a pattern for each shape out of cotton fabric. I just used scraps I already had. Here are the finished dimensions of the tops for the two I made. Ham- 14" top to bottom and 10" across the center and the Roll- 20" long and 5" across.
2. Cut out 2 pieces of fabric for the inside, 1 piece of wool and 1 piece of cotton for the outside of each shape.
3. Sew all along the edges of the inside fabric keeping the bottom (straight-ish) part open. Turn it right side out and fill it with saw dust. This was hard. You have to really pack it in there using whatever means available! When filled, hand sew the edges closed. Do the same for the roll leaving one of the rounded edges open.
4. Now make the outside using the wool/cotton fabric. Once turned right side out pull it over the 'inside'. Tricky, but do-able. Then hand sew the bottom closed. Repeat for roll.

I realize you can buy these at JoAnn's and with a coupon it's a deal but my daughter wanted/needed a larger ham than what they sell there. Plus, I couldn't find a roll anywhere. My daughter has been home for Christmas break and has been using it quite a bit. That makes me smile!

Thanks for stopping by!

Blessings!

Thursday, December 30, 2010

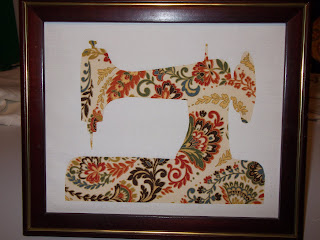
Sewing Machine Silhouette


I am glad I can now show you one of the things I made for my daughter Jocelyn. I saw this here. Since Jocelyn is majoring in Fashion Merchandizing and sewing is her passion I thought she would love it.

I followed the directions that Jess from Craftiness is not Optional posted. Please check out her blog, she had awesome tutorials.

I found a graphic on Google of a sewing machine that I liked, printed it out and traced the outline onto the heat and bond. The fabric is from JoAnn's. I was trying to go for a vintage feel. On my first attempt I ironed the heat and bond to the right side of the fabric... Yeah, it doesn't work when you do that. Second try I got it right. Then... I tried to use the glass that came in the frame. It was the kind where the back sort of slides in. It was one I had here that I wasn't using. When I tried to push the back up I got it almost in and CRACK- the glass broke. I actually couldn't decide if I liked it better with the glass or not. Since the glass was destroyed, I decided to Scotch guard it to protect it from getting dirty.

You could use this same technique for other things besides a sewing machine.

Super cute. I think I am going to make one for my guest/sewing room!

Enjoy and Happy New Year!

Wednesday, December 29, 2010

Hallmark or Not.... Silhouette Ornaments

I give my kids an ornament every Christmas. The plan is that when they get married I pass their ornaments on to them for their tree. I LOVE Hallmark ornaments and try to get them one that fits for that year. Here are a few from years past.

Thomas - the year he was in a band (that practiced in our basement..)

Jocelyn- the year she went on her first prom.

You get the idea. Well, this year I just wasn't crazy about any of the ornaments out there. I wound up buying some but decided to take them back. To go along with Jocelyn's home-made pledge I came up with this idea ~ Silhouette Frames

I had seen something like this in blog-land so at Thanksgiving I tried to get a side view picture of each of my kids. All of Michaels pictures look like so I had to improvise.

Supplies:
  • $1.00 frames from JoAnn's
  • Scrap book paper - patterned and solid black
  • Ribbon - I used black and red
  • Glue gun
Directions:
1. I used ipages, but you can use word, etc. I opened up a new document. I made a 2 1/2" x 3 1/2" box. The I inserted a picture and resized until it fit inside the boxed area with room all around. Once you get the heads the size you need you don't really need the boxes so you can delete them and make more room for more heads. I printed it out.
2. I placed the printed out paper on top of the black paper and cut them out. You need to add the curved neck area. No pattern here I just winged it.
3. I cut out a 2 1/2" x 3 1/2" piece of the patterned scrapbook paper and since I wasn't sure if they might want a different silhouette I just taped the black silhouette on to the paper. I put the frame together.
4. I hot glue the ribbon on the back at the top so you can still open the back up or use the stand.

That's it!
Enjoy!

I like the way they turned out but if I am honest I am still torn about the Hallmark ornaments.
Thankfully my husband, daughter in law and her parents each bought me one so I have three new ones for the tree! :)

Tuesday, December 28, 2010

Cupcake Pincushion

I saw this in a book from the library. I have a friend who has a cupcake making business and who also loves to sew and immediately thought I would make one for her. I wound up making one for my daughter, my daughter in law, and my mom too. It can basically be made all by hand or you can use a machine.

Supplies:
  • Wilton Silicon Cupcake Liner
  • Felt (Brown for chocolate but pink or cream would also work!)
  • Polyfill
  • Sand
  • T-shirt fabric
  • Needle and Thread
  • Fabric glue
  • Red pom-pom (for a Cherry!)
  • Ball pins (for Sprinkles!)
  • Tacky glue
Directions -
1. Cut out one 2" circle from felt.
Cut one long curved piece from felt.
Cut an oval shape from felt and cut a swirl pattern in it. (about 6" x 5")
Cut one circle from knit fabric. (about 4" 3/4)

2. Put curved piece inside the cup and pin to fit. Trim top down.

3. Sew seam. You could also just use fabric glue.

4. Baste around the knit fabric. You can do this by hand or by machine on the longest length.

5. Gather it up till it fits around the top of the 'cupcake'. Sew in place and then turn inside out. It will look sort of like a chef hat.
6. Sew the bottom on but leave an opening.


7. I put a little bit of polyfill in first (I am not sure why...) and then pour in the sand. This is a bit of a challenge but I just kept pushing the sand down so it was packed.

8. Sew the circle closed.
9. Take the oval piece of felt and starting in the center start pinning it down until you get to the end.

It will look like this.

10. Start at the bottom of the 'frosting' sewing the 'frosting' to the top of the cupcake, going around and ending at the top. Then sew pom-pom on.


11. Glue into the Wilton cupcake liner with Tacky glue. Fill with some Ball pins.

All done!

*I just wanted to say that although I saw this in a craft book (I can't remember the name of it!) I did change it quite a bit. For one thing the book said to fill it with just polyfill and that was just too light and wouldn't stand up. Very annoying. The sand definitely makes it more sturdy. The other thing was it had you sew right through the bottom of the cup to attach the cupcake and the liner and I just didn't like the look of it. I changed the actual construction too.


Monday, December 27, 2010

Christmas Jammies

Our family tradition when my children were growing up was that they each got a new pair of pajamas for Christmas. It was the one gift they could open on Christmas Eve. All the pictures of Christmas morning showed my kids in nice, brand new jammies. Well, my kids are grown now. Michael is 27, married for almost 3 years and I figure his pajamas are now his wife's concern. Thomas is 24 and still living at home. To be honest he comes and goes but he hasn't officially moved out yet. And then there is Jocelyn, my 21 year old daughter who is studying Fashion merchandizing at a college four hours away.
This year Jocelyn requested footy pajamas for Christmas. Now, she can still fit into the girls clothes at Target and Target happened to have footy pajamas for $12.98! But... she wanted a pair made by her mom. What is a mom to do? Well, I was going to make her pj's! :)
Guess what? They don't sell footy pajamas patterns anymore. I found a McCalls pattern for pajamas that included pants and an one piece but no feet. I had to try to figure out the feet on my own. I wound up buying a pair from Target to look at. I think I still need to tweak the feet. I am happy to say she loves them. Here they are....

Ok, now I can't make Jocelyn a pair of pajamas and not make a pair for Thomas! Here is the pair I made for him. I made the bottoms out of fleece from JoAnn's and then found a t-shirt at Marshalls. I was going to paint a dinosaur on the front. I found an image on google, printed it out, traced it onto waxed paper and cut it out. Then I tried to iron the paper to the shirt so I could paint it but that did not work. Thankfully Jocelyn was home from school by this point and told me I needed freezer paper. There was no freezer paper to be had so Jocelyn showed me how to make an applique out of an orange t-shirt. I put the right sides of the fabric together, traced the dinosaur on and then sewed all around the edges. Trimmed all around, clipped to the corners, cut a slit in the back and turned right side out. My zig-zag isn't working so I hand sewed on the dinosaur. I really like how they turned out.
Here's hoping you have a warm and cozy day.