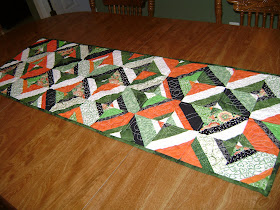
HAPPY FIRST DAY OF MARCH!
Last month I made a Valentine's Day Table Runner with strips that was super easy. I thought I would do the same for this months runner but I was encouraged at my first sew in to try new things so I thought I would try a wonky one this time around. I normally like things to match up so this was totally new for me. When I showed my husband some of the squares I made at the sew in he said "I don't think I can handle that. The lines don't match up." :) Well... To be honest I wasn't sure I was going to like it either but I decided it's only going to be on the table for one month so I was going for it. Plus there is usually so many papers on the table he won't see it anyway! :)
Here is how I made my St. Patrick's Day table runner.
I started with 16 different pieces of fabric. I only bought a 1/4 yard of each, except for the fabric I also used for the binding. I bought a 1/2 yard of that. I decided on greens, orange, and white to match Ireland's flag, and added some black. I figured out my runner would be 18" wide and 54" long. That meant I needed 12, 9" blocks. Each 9" block is made up of 4, 4 1/2" blocks. That meant that each of my blocks had to be 5" square. I took a piece of paper and cut it to a 5" square to use as a visual.
1. I cut strips of fabric all different sizes. The laid them out so that the greens weren't next to each other and sewed the strips together.
2. Using my paper pattern I laid it on top of my strips and using my plastic ruler and rotary knife I cut out my squares.
This picture shows that I was able to get three squares out of one set of strips. Then I had the 'top' and the 'bottom' sections. I then took another piece of fabric, placing it between them and made new squares so I wasn't wasting a lot of fabric.
I kept doing that until I had all my squares. I made 6 squares from each pattern and then I made 12 out of one set that I thought looked like the flag and placed one of each of those squares in each of the 12 blocks.
3. I took all my squares and laid them out on a table to decide how I wanted the layout. I tried to spread out each different pattern and not have them too close to each other. Then I sewed them together.

4. Once the top was sewn together I used spray adhesive and put the batting and backing together. This time I also used safety pins to keep it together as I stitched the top. Which will come back to haunt you if you don't remember to take them out BEFORE you place the paper over them....
5. I decided I was going to do free motion shamrocks so I found a shamrock I liked on google images. I played around with it in pages to get it to the size and placing that I needed and printed it out. THEN I took plain paper and with the copy on top sewed through the layers of paper on my machine, minus thread. I did 6 at a time. I placed the paper on the quilt, pinned it in each corner and then stitched right through the paper. After I was done I just tore the paper away. This is BRILLIANT. Thank you Lisa!
A close up of my stitching. I am just learning so don't look too closely.
Can I tell you that I just LOVE this one!!! I think I will be sad to see it go when the month is over. I guess I need to start thinking about April's...
Blessings!


Hey! Nice job. I love it.
ReplyDeleteThanks Lisa!
ReplyDeletethanks for commenting on my kitchen!
ReplyDeletegood job with the table runner - it's one of my goals to become better friends with my sewing machine and maybe even learn to quilt a little!
Thanks Angie! I am just getting back to quilting from a long absence. I am enjoying it and loving all the beautiful fabric I am seeing on Etsy! I'll be checking your blog regularly!
ReplyDeletethe shamrock quilting is so cute.
ReplyDeletemegan
craftycpa.blogspot.com
Thanks Megan! I am so new at free motion quilting but the paper helped so much! I am definitely going to use that technique on my next runner!
ReplyDeleteI envy your talents. I love the pattern, great job!
ReplyDeleteThis is beautiful! Great job.
ReplyDeleteGreat job on the shamrock quilting. I love the splashes of orange, too!
ReplyDelete