Monday, August 29, 2011

Cheat Silk Screened T-shirts - a tut

This summer was my first time working the two week camp our Montessori school has for 4 to 8 year olds.   Each year the kids make a shirt as a keepsake.  My daughter Jocelyn showed me this technique.

SUPPLIES:
  • T-Shirt
  • Embroidery hoop
  • Sheer fabric
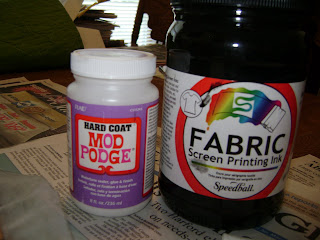
  • Hard coat Modge Podge
  • Fabric Screen Printing Paint
  • A squeegee like you would use in the shower.  Make sure it will fit within the hoop.
DIRECTIONS:

1.  Decide on your design. I used the words 'Discover, Observe, Explore in a circle using Word.  Print out your design.  
2.  Place the fabric in the hoop and pull the fabric tight!

3.  Place the design under the fabric in the hoop and using a pen trace the design on the fabric. 
                                       
4.  Now take a paint brush and paint all the areas except the parts where you want the paint to come through.  You can hold it up to the light to see if you've missed any area.  Go all the way to the edges and you'll have to do a couple of coats. 
                                       
5.  Place a piece of cardboard inside the shirt to protect the back. Place the hoop down where you want it on the shirt.  Spread some paint along the top of the project area and take the squeegee and pull the paint straight down over the fabric.  You only need to do this one time. Carefully remove the fabric/hoop. Sorry I don't have a picture of that. I took them but apparently I lost them in cyberspace.  It took me a couple of tries so practice on paper first.  You can wash the hoop when done and reuse it.

6.  Once the paint dries iron the back of the front to set the paint.
I made almost 30 shirts. The kids and parents really liked them. We had the kids put their handprint in the center and then they used their fingerprints to make a few bee's flying around.

Thanks for stopping by.  I appreciate you and your comments!

Blessings,

Tuesday, August 23, 2011

Quilt Covered Composition Book, a tutorial

I saw these covered compositions book here and thought they would make great gifts.   
 Front
 
Back
SUPPLIES:
  • Fusible batting - mine was 11" by 25" Composition book - I found mine at Target for 40 cents each.
  • Fabric - this is a good project for using up your scraps.
  • Lining/backing fabric  - 11" by 25"
  • Optional - Embroidery thread, wonder under if you want to use an applique
DIRECTIONS:

1.  First measure your book. 
 2.  Add a 5" overlap on each side and make sure you have 3/8" added to the top and bottom.  Cut your fusible batting and backing fabric.
 
  2.  Lay out your fabric to your liking.  Sew together and then iron onto the fusible batting.  I used spray adhesive to attach the backing fabric to the batting but you can use pins.

 
3.  Stitch as you would like.  I did some free motion stitching and hand stitching.  Now is when you would do applique or embroidery if you want.


4.  Take two strips of fabric and bind the short edges on each side.  Then finish the long edges with a serger or a zig-zag stitch. Turn over the 5" overlap, right sides together and stitch a 3/8" seam.  Trim the corners and turn right side out.  Hand or machine stitch the center area between the two flaps.  
I made this one for my partner in the Scrappy Haiku Mug Rug Swap.  
The front.
And the back.

It's a quick, fun project that can be reused when the book is filled.   You could even add a button and hair tie or ribbons so it would stay closed.   If you make one I'd love to see a photo!   Thanks for stopping by!
Blessings,


Check out my linky parties to see where I'm linking up!

Thursday, August 18, 2011

I HATE TO SAY IT....

BUT THERE ARE ONLY 128 MORE DAYS TILL CHRISTMAS!

So with that said I think I am going to actually start making some of the things I've been pinning over on Pinterest.  Like this cute bird nest necklace.   
Blessings friends,

Wednesday, August 17, 2011

PURPLE DOOR 2011

We just returned from our ninth year at Purple Door.  The first year we went was for my daughters birthday and I guess we are either hooked or crazy because we keep going back.  This year was the first time we didn't have any of our own kids with us!  And it has probably rained 7 out of the 9 years we've gone.  We go with great friends, Matt & Jennie and their kids.  We volunteer and work a 4 1/2 hour shift on Saturday and then we all go back on Sunday morning and clean the grounds.  You get to hear lots of good music, see some interesting people and make new friends. Here are some photo's from this year's trip.
Our campsite before the rain... 
I couldn't resist asking this guy if I could take his picture!
I am not sure what organization this guy was with but it had to be hot in there. 
This year the concert was at a new venue so there were lots of indoor stages and seats.  Here is our 'gang'.
A new band SisterBrother my daughter Jocelyn blogged about here.   They were awesome!
This was Sons & Daughters.  Great harmonies and a cello!

Check out their music!

Blessings, 

Friday, August 5, 2011

My First Baby Quilt

 I just made my first baby quilt for the daughter of a good friend.  This mom to be went through Kindergarten to Twelfth grade with my oldest son Michael.  I wanted to make something special for her first child, a daughter.  The baby's room is purple and lime green.
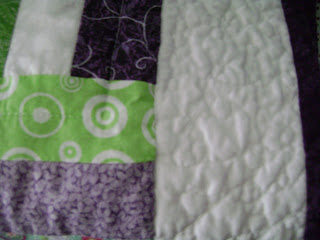
Here is the back.  I added a strip using all the different fabrics from the front just for a little interest on the back and I machine quilted it with a zig zag pattern.
 I did a meandering pattern around the boarder.
                                
I actually used my portable design wall for the first time with this quilt.  My friend Lisa over at 9patchnurse told me about it!  I bought a cheap table cloth from Walmart.  I picked up some of those 3M hanging hooks and woo-la!  It was a HUGE help to be able to look at it from afar and see where I needed to move things around.  

Thanks for stopping by!


Blessings,

Thursday, August 4, 2011

It's Official

I just got my picture id for school.
And my first textbook!  
I must be crazy! :) 

Blessings,