Monday, January 31, 2011

A Love Hate Relationship

With this....


I decided the year before I turned 50 that I was going to get in shape.  I had had a couple of bad years struggling with kidney stones and was very inactive.  My goal was not necessarily to look better, although if that happened I would be fine with it, but mainly to get heart healthy.  At the time I was working at a small private school and the gym teacher for the high school allowed me to take the class along with the kids.  When I say I am not athletic that is no joke.  However, I did learn how to play basketball, shoot arrows in archery, play volleyball, and my absolute favorite, to play soccer.  Doing that really helped me get into better shape but my goal was to run a 5K.    

I started running in April 2010 and ran my first 5K in May just a few days before I turned 50.  I ran two more 5K's that summer and then spent alot of time walking my dogs so I wasn't running.  I am planning to run that same race again this year so I figured I better get at it.

I have figured out I am visual learner and for me I need to see progress.  I have a Nike+ which is a little gadget that plugs into the bottom of my ipod and it tracks your runs.  Then you link it to the Nike+ website and you can see your progress on a page that looks like this.  You can set up goals and even make a little mini you! So fun!
Another tool that is useful is the site Sparkpeople.  One of the blogs I follow Me Making Do posted about it recently and I decided to start using that tool too.   Check it out.  It is totally free.  They have both a food plan if you want to lose a few pounds or an exercise plan.  There are alot of options within the program so you can make changes if you want. 


So yes, a love hate relationship.  Right now I'm not loving it so much but I am hopeful that will change as I keep plugging along.   


Let me know what you are doing to get in a more healthy place!


Blessings!

Thursday, January 27, 2011

Bacon Cheddar Meatloaves

Who doesn't love bacon and cheese?   These are super easy and taste delicious.  


Ingredients -

  • Ground Beef, thawed - (I used 2 lbs and made 7 large individual size loaves)
  • 1 Egg - slightly beaten
  • 6 ounces of Tomato Sauce (I didn't have any so I used Hunts Four Cheese)
  • 1 Tablespoon Minced Onion (you could use fresh if you want)
  • 1 Tablespoon Dried Celery (I didn't have any, so didn't use)
  • 1 1/2 Teaspoons Italian Seasoning
  • 1/3 cup Quaker Instant Oatmeal ( I used one pack- didn't even measure it)
  • 6-8 slices of Bacon
  • 6-8 slices of Cheddar Cheese
Directions - 

1.  Preheat oven to 350 degrees.
2.  Mix all ingredients together, except the cheese and bacon.
3.  Form into patties and place on baking pan.
4.  Bake for 30 minutes, take out and let cool.  Drain any grease off of pan. 
5.  15 minutes before you are ready to serve, place cheddar cheese on top of each loaf and then wrap a slice of bacon around and place back on pan. 
6.  Bake for an additional 15 minutes, broiling for a couple of minutes at the end to crisp the bacon.
 Here they are after the first 30 minutes.

 With cheese and bacon ready for second baking.   Don't mind my nasty baking sheet!


Plated up on my 'vintage' Corel!  Delicious!


NOTE - Some people with gluten allergies can't tolerate oatmeal so be aware. :)

Tuesday, January 25, 2011

True Confessions

Not exactly what you might think I mean but I have to tell you what I got myself into. 

One of the blogs I follow, During Quiet Time hosts a potholder swap.  I saw the post after Christmas and since I had just been making a lot of crafts I thought I would be 'brave' and sign up.  I mean how hard is it to make a potholder?  I can sew, I've made quilts (a long time ago), heck I've even done some embroidery in my day.  HA!  

When I say I am way out of my league I am not kidding.  The best part (or the worst part, depending how you look at it is) when I first signed up I was turned down.  And that was ok.  I mean I was a little disappointed but I am all about rules and was fine with it.  Then I had a thought.  One of the problems that come up in a swap is sometimes the potholders don't get made or sent, leaving someone without.  

SO...  I emailed Amy and asked her if it would be ok with her if I made two potholders on my own that she could have in the event someone couldn't get theirs done.  That way I could 'participate' without the pressure! :)  And what do you think she did... She let me in the group!!!!!!!  YIKES...  And the 'theme' this time around is monotone.  Your partner picks a color and you make two potholders and mail them by a certain date.  

I am now learning how to free motion stitch and reading quilting books from the library and praying that my partner likes what I have come up with.  Here they are.  I still need to add the binding.  And practice some more for the other back.   


 I was inspired to do sort of a Subway art feel.

Sometimes we need to be stretched a bit and get out of our comfort zone.


Blessings!


Monday, January 24, 2011

Potholder Tutorial


I had some scraps left over from an apron I made my mom so I thought I would make her a potholder to match.  This is an easy way to make yourself a new one.  I don't know about your potholders but mine get nasty fast.  It doesn't matter how often I wash them.  This is a log cabin pattern and I am sure this technique has a name but I don't know it!

Supplies -
  • Scrap fabric - You will need one 8x8" piece for the back and 2" strips of the fabric for the front. 
  • Batting - I used one piece of batting and one piece of felted wool.  I used the felted wool on the bottom so that the batting wouldn't get caught up in the feet of the machine.  You could use a scrap of fabric under the batting if you want.
  • Thread
  • Purchased 1/2" wide Double Fold Bias Tape for the binding. 

Directions -
1.  Cut a 8" square of batting.   Pin layers together.
 

 2.  Place the piece that you want to be in the center, in the center. :)

3.  Pin fabric to first piece, right sides together, and sew one edge 1/4" seam.  Flip fabric open.  I just cut the fabric strips to length as I needed them.

4.  Keep doing the same thing.  Pin fabric down, sew, and flip open.
 

 Here is the center and one 'row' completed.
 Second 'row'.
 Third 'row'.
The back is going to look like this - not so pretty.  

6. Trim the batting so the edges.  Add the back piece of fabric and sew along the edges to hold everything together.

7.  Take your bias tape and open it open it up, placing the edge of the tape to the edge of your potholder and sew in the folded area of the tape.   Corners are tricky but I just sew to the point where I need to turn and fold the tape out of the way, pivot and proceed. When done sewing it all around, I fold the end of the tape under and sew that down.  Turn the bias tape over.  It will now cover the edges and you can either hand stitch it down in the back or use a machine. You can add a loop or a grommet if you choose or just have it as is.


No need to top stitch anything because it's already done for you!  

Blessings,


Friday, January 21, 2011

Woo-Hoo


I was featured over at Me Making Do!  Go check it out!  I love Heather's blog.


What fun! :)


Happy Weekend...
Blessings,

Wednesday, January 19, 2011

Pumping Iron

Not exactly what you might be thinking!  
I've been trying to get my sewing room in order.  Specifically my fabric.  I guess you could say I've gone through a sewing 'dry' period.  Yes, I altered bridal gowns when asked, hemmed friends sons pants and then took the hem out after he grew, and did a little bit of mending but not a lot of sewing for pleasure.  Thankfully I feel like I am out of that 'dry' season and thought I needed to organize my material.  


Pumping Iron?  Yup, for THREE DAYS STRAIGHT.....  


Day 1 - Calico's - 
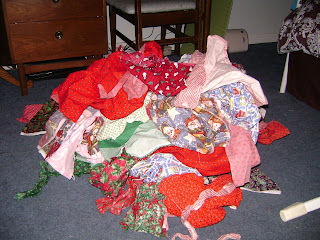
That huge pile went from that to this, organized by color.  


Day 2 - Solids - 
Another huge pile turned into nice, neat stacks.


And Day 3 - My Christmas fabric 
By this point I was DONE WITH IRONING but I had to finish the job.

My daughter would be so proud!  Heck, I'm proud too! :)  I don't think I have ever ironed so much in so few amount of days.  Fortunately (or unfortunately) I still have a pile of my husbands work clothes I need to get to so I won't get out of practice.   Do you think ironing constitutes a work out?  Just wondering....

Have a blessed day!

Monday, January 17, 2011

A Silhouette Giveaway

I am sure a lot of you have heard about the Silhouette.   You've seen the awesome crafts made using it out in blog land.  Well, now you have an opportunity to win your very own!  


Have you seen what a Silhouette machine can do???   Oh my, the possibilities are endless.  


Today over at Keeping it Simple, Kaysi is having an awesome giveaway from Silhouette.  Go here to check it out.  I just love that you don't have to buy cartridges for this machine.  It can use the fonts you have on your own computer.  


Go and Enter!  I hope you win!  Well, I am sort of hoping I win but I will be happy for you if you do, really I will! :)

Blessings friends!

Bunko Babes...

What is more fun than a bunch of friends gathering together for a meal and a game of Bunko?  The chance to WIN! :)   


How we began...   A few years ago I was a substitute for my neighbors Bunko group.  It was so much fun I kept thinking about starting my own group.  When I found out that the small private school where I had taught for 15 years was closing, I knew I needed to do something for a number of reasons.  One, was just to keep in contact with my friends that I wouldn't be seeing on a daily basis.  Two, was I just needed something to look forward to each month.   

I put out some feelers and we started last January at my house.   We have a wonderful group of woman.   We keep a list of substitutes incase someone can't make it.  Each month a different lady hosts at her home.  The host provides dinner and dessert and a $15.00 Boobie prize.  After we eat dinner we start playing.  It's just rolling dice.  EASY RIGHT?   We play 2 rounds, eat dessert, and then play two more rounds.  We each contribute $5.00 towards the prizes and they are awarded as follows = Highest score ($40.00) Most bunkos ($20.00) and Lowest score gets the 'boobie' prize.  We rotate around the three tables so you get to chat with everyone as some point in the evening.  The beauty of it is you host it one time and then for the rest of the year you just go and enjoy.  For more info on the rules of Bunko go here

My husband created an awesome Excel file for us which makes figuring out who wins easy.  It calculates all the months so in December when we had our Christmas party we had prizes for overall scores too. If anyone is interested in the spreadsheet he created I would be happy to email it to you.

I think one of the things I enjoy the most, besides all the laughing, are the new friends I've made this year.    


Here are some pictures from our group.

Chicky preparing to feed all of us!

  Connie, Karen, Ms. Connie, and Trish

 
Julie and her sister in law, Lisa

Lisa, and Me!


It's my turn again this Friday!  Maybe I'll win this time!!  :)


Thanks for visiting.  Have a blessed day!  

Wednesday, January 12, 2011

Sweater Re-make

 I saw this idea in a craft book I got out of the library and thought I would make one for my daughter.

Materials/Supplies:

  • Solid colored, long sleeve button down sweater - I found this one at a local consignment shop.
  • Co-ordinating fabric for the ruffles, covered buttons and flower.  I believe I bought 1/4 yard.
  • Fabric for the leaves for the flower.   I used a piece of brown wool that I felted.  (Washed in hot water and dried in dryer.)
  • Fabric glue for flower.
  • Pin back and hot glue gun.
  • Co-ordinating ribbon for sleeve ruffle.
  • Button kit sized to match the buttons on sweater- I bought mine at JoAnn's.

Here is a close up of the fabric I used.

Directions:

1.  Decide where you want the ruffle to start (somewhere near the elbow).  Measure and mark both sleeves, then cut.
2.  Cut two pieces of the co-ordinating fabric 5" by 22" inches.  This is for a XS sweater so you might want to make it longer and wider for a larger size.  
3.  Sew the short seam together on both pieces.  
4.  Hem one end of each ruffle.
5.  Make basting stitches on the unfinished end.  Make sure you back stitch when you start. The fabric will gather better if you use two lines of basting.  Pull both top threads to make the gathers.  
6.  Pin right side of sweater and right side of ruffle together and stitch.
7.  Using the ribbon you chose, sew it down where the two fabrics meet.
8.  Using the button kits, cover the new buttons with the co-ordinating fabric. 
9.  Use remaining fabric to create a flower pin.  Take a long strip and start rolling it up, twisting the fabric (turning it over)  every half turn or so, gluing as you turn. Let dry. Cut a circle with leaves attached out of felt or wool and hot glue the flower on.  Hot glue a pin to the back.  

All done!  A spiffy new look for an old sweater.

Thanks for stopping by!

Blessings!

Sunday, January 9, 2011

Everyone Should Have a Pretty Apron

This Christmas I made a few aprons as gifts.  I had seen one similar to the first two on Etsy and thought I would try to make one.  Since I didn't have a pattern I used two of my own aprons as a guide, making sure the bust area was large enough to actually cover a bust and for the length.   

This one was for my daughter in law who has a black, red, and white kitchen theme.  I bought one yard of the cherry fabric, one yard of black polka dots, and a red flat quarter.  It is lined with the polka dot. There was enough fabric on the flat quarter to make both pockets and the ruffle trim.  I used a vest buckle at the neck so you don't have to tie it.  I placed the ruffle low enough at the neck so that if they wear it with the other side out you can't see it, although there aren't pockets on that side. 

 This one is my mom's.  I tried to match her kitchen colors.  

 I made this one for my daughter.  The colors in these pictures are not accurate.  The picture below is a close up and shows the actual colors.  I saw it in a craft book I got out of the library and thought it was so cute.  It is totally reversible down to the tie that has little button holes to pull it through to the other side.  I love the way it turned out.
Here is a close up of the bodice.


Now that Christmas is over I am going to make myself one.  Maybe it will inspire me to want to cook more than I do now.  We'll see!


Thanks for visiting.  Have a blessed day!

Thursday, January 6, 2011

A Parade of Snowmen

I just finished putting away my Christmas decorations and thought I would post pictures of some of the snowmen I've made in the past.

This one is made of muslin, felt hat, fabric scarf, wood heart buttons, 
twigs and a painted face. 

 Rolled up batting.  Purchased felt hat. Big, honking nose made from styrofoam, 
twig arms, buttons for eyes.

 This one made from round wood boxes.  Just paint with a little fabric for his 
hat and scarf and buttons.

 I love this one.  My husband used his band saw to cut it out and I made these for all my kids teachers throughout the years.  I stained the top part.  The snowman is painted with white textured paint for the snow and he has a paper twist scarf.  

 I made this at a ladies craft night at our church.  The lady who taught the class 
cut them out for us.  He is holding a little broom in his one hand!

 This one is just a 1x6 painted white (black at the top) with a piece of thin wood for the brim.  He has button eyes and mouth.  I just noticed he's lost a few buttons on his tummy.  I used textured paint on him and a fabric scarf.  His nose is a dowel I whittled at the tip that is way too big for his face!

This one is my favorite.  The Weber snow family. I made it from a pattern 
using white flannel and batting.  Fabric scarves, one hat is made with felt 
the other from a sock, buttons, and a sharpie:)


You can tell I made it a while ago because Michael is now taller than my husband Frank, Thomas is as tall as Frank, and Jocelyn is as tall as I am! Even with Michael married almost 3 years now I can't bring myself to change it.  I know I should either re-do the whole thing and add Michaels wife or take Michael off.   But I tell you it is still very weird for me not to write Michaels name when I sign Christmas cards so for now I guess it will stay like this. Has anyone else felt like that?

Thanks for visiting!

Blessings!