Pages

Saturday, December 31, 2011

A Year in Review

Well, it's been a wonderful year in many respects. I started a new job in January, which brought new friendships into my life. We went to Aruba for a wedding. I started going to college. I joined a local quilt guild and made more new friends. We refinished some of the hard wood floors in the house. Had a few good weekend trips to see my daughter at college.  Went camping. We played lots of card games and made lots of memories with my family. God has been and is very good to us! 


Here are some posts from the year that got a lot of views.  Thanks to my friends and followers who take the time to read my posts.  I appreciate you all so much.  May God richly bless you throughout the new year with much happiness, peace, love, joy, and laughter!

Blessings,

Sunday, December 25, 2011

Merry Christmas with Love


When love came down to earth

And made His home with men,

The hopeless found a hope,

The sinner found a friend.

Not to the powerful

But to the poor He came,

And humble, hungry hearts

Were satisfied again.
What joy, what peace
Has come to us!

What hope, what help, what love!

Thankful today for the gift of Jesus and for you!  Blessings!

Friday, December 23, 2011

Personalized Laundry Bag Tutorial

Last minute stocker stuffers!
I saw this idea here awhile ago and thought they would make cute and functional stocking stuffers. I bought the laundry bags at the Dollar store. I found white ones that were 3 for $1.00 and then I found blue ones that were 2 in a box for $1.00. I used scrap fabric and my daughters accent machine to embroider the initials. You could applique an initial or hand embroider one. I was pressed for time since I started today so I used the machine.


Here are the steps.
1.  Cut the piece of fabric 5" by 12.5".  Fold in half and press.
2.  Turn so right side of fabric is facing each other and sew the short ends.  
3.  Turn right side out and turn down (to the inside) a 1/4 " all around. 
4.  Pin it in place and sew along all the edges.   
5.  If you want you can add a piece of co-ordinating ribbon to the zipper pull.  
*If you are going to embroider I would suggest adding some interfacing where the letter will be to make the fabric stronger and less likely to pucker.


My daughter is home for Winter break and brought with her an exchange student, Kris,  from Taiwan. Last night she made for us a traditional dish they eat at home.  It's called

蕃茄炒蛋/西红柿炒蛋.


Which translates to tomatoes and eggs.  Kris is cute.  She took pictures of the Chicken Marsala I made for dinner, and eggplants at the food store, and the bulk isle at Wegmans.  Her scrap book will be very interesting.    


Blessings friends,

Wednesday, December 21, 2011

Superman Beer Mug


When Will I Learn?


I saw these adorable glass etched glasses SOMEWHERE and after looking through all of my 94 RSS feeds, my trash, and then thanks to my awesome daughter my internet history I finally found the site so I can give credit where credit is due.  Wowsers! I MUST remember to 1. flag the post or 2. Pin it.  :)  I am Momma Hear Me Roar made these awesome glasses and gave me an idea for the hubby.

Now, I don't have a Silhouette (yet) so I took some of my vinyl for my cricut, found a Superman logo on google images and used my exacto knife to make my stencil.  

If you want to try your own make sure to keep your eyes out for Michaels coupons because the large bottle of Etching cream was something like $34.97. I bought a small bottle with my coupon and it was under $10.00. I bought the beer mug at Kitchen and Company for $1.99. 

It's not perfect but I think he will like it!  


Blessings to you all,

Monday, December 19, 2011

A Reindeer Mug Rug

This is what I made for our work gift exchange this year.  I had the idea to find a nice pottery mug and then make a mug rug to match it.  The more I thought about it, while I love pottery mugs, for the most part they are sort of plain so I found this mug at a local coffee shop.
I participated in a Christmas charm swap recently and used some of the fabrics for the top. I used fusible fleece for each side and then did diagonal stitching across to keep them together except where the reindeer was on the back. 
                                                                    
This is the back. I traced the reindeer onto tracing paper and made an applique. I wound up putting two pieces of fabric together, sewing it around and turning it right side out. I did it this way because when I tried the applique with one piece of fabric I could see the backing fabric through the white and didn't like the way it looked. I used a solid lime green that matched the ornament on the mug for my binding.
                                              
I bought a bag of Raisinets, put them in one of those plastic bags you can buy in the candy making isle of JoAnns and made a 'Reindeer Droppings' label for it out of card stock. I found a cute reindeer graphic on google and typed up the serving size and calorie count on the back.

Our gift exchange was done by rolling dice. It wound up that my gift was the last one opened so no one fought over it but I think the lady who got it really liked it! 

Blessings friends!


Please check out my Linky Party button to see where I am linking up!

Thursday, December 15, 2011

Notebook Covers

I saw these adorable mini memo book covers here and decided I would make a few for Christmas gifts. Twenty books later I am finished! Of course I started wrapping them and then remembered I needed to take a picture! The tutorial was awesome and they were pretty easy to make.    
            
A closer look.
I made each one different.  Some of the scrapbook paper had a coordinating color on the back so that worked out nice.  I coordinated the embroidery thread to match.  I bought the brads at Michaels.  The notebooks were 4 for $3.99 at Staples.  I think they will make nice stocking stuffers.

Blessings,

Wednesday, December 14, 2011

The Stockings Were Hung...

Me and my big ideas!  I had bought this fabric at JoAnn's after Christmas last year with the idea to make new stockings. Why I waited until December to start, I have no idea. I was going to make them all the same with the maroon on the bottom but then thought the green might look more masculine.  I used my daughter Jocelyn's Accent machine to embroider the names. I made 11 in all. My parents get a new one, our family including a boyfriend and a girlfriend. I even made one for the new friend from Taiwan that Jocelyn is bringing home from college for Christmas break. 
 I sort of followed this tutorial after seeing these stockings here.
Now my problem is how do I hang 11 stockings on my mantel! I only have 8 stocking holders. I hung the last three up by paper clips just to take the picture! I don't think that is going to work once I fill them! :)

Blessings to you and yours, 

Tuesday, December 13, 2011

A Message from Santa

Have you seen this?  I am such a nerd.  I am all about celebrating the birth of Jesus but I just love this silly Santa message you can send to people.  
I made one for you!  Check it out.  To watch the one I made you need to use my email address and the pin below.


www.portablenorthpole.tv
Username:  fkmtj@comcast.net
PIN:  78zs


Blessings,

Sunday, December 11, 2011

Gotta Love Pinterest


Pretty funny.  
I don't know how many of you know the song Home by Edward Sharpe & The Magnetic Zero's but my husband LOVES that song.  Our daughter used it as the music for her first fashion show two years ago at college and he's been crazy about it ever since.  So I was checking out Pinterest tonight and besides finding that cute saying above I was inspired to make this for my husband for Christmas.  The words are from the song.

I am going to put it in a nice frame.  I think he will really like it! :)


Blessings,


Friday, December 9, 2011

The Vanilla Adventure part 2


Yesterday I took my Vanilla that's been brewing since the middle of May and bottled it all up. This year I decided to buy 4 ounce bottles so I would have more to give away.  You can go here to read about where I buy my beans and bottles. My one gallon jar of Vanilla made 20, 4 ounce bottles and 3, 8 ounce bottles.  After I made my last batch I read about using the left over vanilla beans to make vanilla sugar.  I decided to try that this time around. I laid the wet beans out on a cooling rack so they could dry out for a day or so.  Then I divided them up between four containers and filled them with sugar.  I used about a 5 pound bag of sugar.  You can use this sugar for baking or add it to your coffee! Yum!
Here is a different kind of sweet. Our Chesapeake Bay Retriever, Sadie. She is the most faithful dog and takes her protection 'job' very seriously. She never leaves my side.   

On a side note I was featured over on Measured by the Heart.  Take a look at Connie's blog.  I found it recently and just love it!

Blessings friends,

Friday, December 2, 2011

A Penguin for Pat

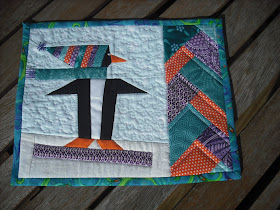
Last year I became cyber friends (and then real friends!) with Heather through a flickr swap. Through Heather I met a group of super nice and talented ladies who have a quilting group called the Wild Threads.  Then they invited me to join their group!  Did I mention these ladies are really talented?  I am not sure if I really belong in this group but I am glad I am.  We laugh alot and I am learning alot too.  So... on to the Penguin. The group decided to have a Christmas mug rug exchange. I vacillated but decided to be brave and join in.  Here is what I came up with.  
The information I received about my partner: "I like winter brights...pinks, teals, purples, & yes, I am a fan of lime green...not into the country/homespun look...and I am a collector of anything "penguin". I found the backing fabric first.  I thought the pattern was busy enough that my stitching wouldn't be so obvious!  It had small hints of orange so I added orange even though she didn't mention it.  A penguin needs an orange beak and feet, right?  I am not very good at FMQ so I hope she likes it in spite of my learning curve. Here is the back. This is my very first label, which is obvious. :)  
The other part of the gift exchange was to come up with a spoon. They said to be creative.  Here is what I came up with. A spoon necklace with her initial on it. 
          
Tomorrow is the big day when we'll be exchanging with our partners.  The anticipation is killing me!  It's like an early Christmas! :)

Blessings friends,

Wednesday, November 30, 2011

Tom the Turkey Tutorial

Better late than never right?  I hope you all had a wonderful Thanksgiving and were able to be with family and friends. Our daughter Jocelyn came home from school for a week and it was so great having her here!
Ok, on to the Turkey. The director at my school showed me a photo and asked me if I could make something like it. This is what I came up with. I made two, one for each classroom.  It helps children with their matching skills and with fine motor skills.


SUPPLIES:

  • Felt - I used tan and primary colors 
  • Buttons to match the feathers
  • Interfacing - I used interfacing in the body and the feathers to make them a bit more sturdy.
  • Googly eye buttons
DIRECTIONS:
1.  Take a dinner plate, trace the shape onto the felt, and cut them out. Do the same for the interfacing.
2.  Use paper to figure out the size you want for your feathers. I was able to get two of the same color feathers from one 8x10 piece of felt. If you are using interfacing, cut that a little bit smaller than the feathers and sew the feathers together making a sandwich of felt, interfacing, felt. Make a button hole in each feather according to the size button you chose.  I also stitched one line up the feather.
3.  Next make the 'head'. Two options here.  I cut an additional piece of tan and sewed it on with a zig-zag stitch. After the fact I looked at it and saw that I could of just zig-zagged the lines on the circle of tan.. Then my husband suggested adding some fiberfill so his head 'popped' up. Cool!  Then I made his waddle and beak. I did all this with out the back on.
4.  Cut out his little feet and pin in place.
5.  Pin the back on and sew around the whole thing.  
6.  Sew the buttons on and you're done!

 Here is a picture of one of the students using Tom the Turkey!

Blessings,

Tuesday, November 1, 2011

My Bucket List...

These might be strange 'bucket list' items as some of them are things I can't do on my own but here goes!

1.    Be a grandma. (When my kids are ready for it...)
2.    Pass all my college classes especially algebra.
3.    Go to Ireland with my family.
4.    Remodel my kitchen and pay someone to finish the               walls.
5.    Learn to quilt well including free motion stitching!
6.    Learn to paint with watercolors.
7.    Take a decent vacation every year that doesn't include          camping in the rain.
8.    Be able to run a 5K the whole way - no walking!
9.    See the Grand Canyon.
10.  Go on mission trips with my husband.  
11.  See each of my children have a relationship with the               Lord. 
12.  See each of my children happily married.
13.  Learn how to use my treadle machine.
14.  Learn how to bake/cook decent gluten free foods.
15.  Learn how to take decent pictures for my blog.
16.  I would like to be kidney stone free.


Thanks for reading.  If you want to play along and enter this contest, please do!

Blessings,

Friday, October 28, 2011

Be Still my Heart..

My husband worked from home today which meant I didn't have access to my the computer until this evening and I just saw that I was featured on two separate blogs!  How much fun is that! :)
Here: (Jocelyn don't look!)
And  Here!
I spent the whole day sewing a project for school/work which felt good but took forever.  I will post about it tomorrow.  And I took my mid-term and think I did really well!   They are calling for snow here tomorrow which is crazy.  I hope you all have a wonderful weekend!

Blessings,

Wednesday, October 26, 2011

Some Font Fun...


I know I am a nerd but I'm ok with that.  I do like fonts.  When I was teaching kindergarten I used them a lot more than I do now but I still like them!  Here is a neat game/activity to test your font knowledge.  Go here Kerntype!

Have a great day!
Blessings,


Thursday, October 20, 2011

Crayon Painting: A Haiku Mug Rug

Last week I blogged about painting fabric with crayons.  Here is the finished product! This is the mug rug I made for the Haiku Mug Rug Swap on flickr. My partner Marjory aka PecksPieces is a very talented quilter who happens to love frogs. I am happy to report that she really liked it! Marjory blogged about it here. What was also really neat is that I sent a picture of the finished mug rug to Suzy at Suzy's Artsy Craftsy Sitcom and she blogged about it too! 
 This is a picture of how it looked in progress.   
I made the mug rug reversible. I did a log cabin on the back with a cute frog in the center.

Here is my haiku:
A hoppy green frog
Sits dreaming of her next snack
Unsuspecting fly...

Not much sewing going on over here right now.  I am stressing about my mid-term next week.  At 51 my brain just doesn't remember things the way it used to! :)

Blessings friends,