Thursday, December 30, 2010

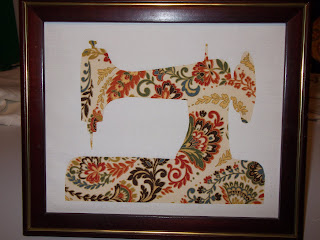
Sewing Machine Silhouette


I am glad I can now show you one of the things I made for my daughter Jocelyn. I saw this here. Since Jocelyn is majoring in Fashion Merchandizing and sewing is her passion I thought she would love it.

I followed the directions that Jess from Craftiness is not Optional posted. Please check out her blog, she had awesome tutorials.

I found a graphic on Google of a sewing machine that I liked, printed it out and traced the outline onto the heat and bond. The fabric is from JoAnn's. I was trying to go for a vintage feel. On my first attempt I ironed the heat and bond to the right side of the fabric... Yeah, it doesn't work when you do that. Second try I got it right. Then... I tried to use the glass that came in the frame. It was the kind where the back sort of slides in. It was one I had here that I wasn't using. When I tried to push the back up I got it almost in and CRACK- the glass broke. I actually couldn't decide if I liked it better with the glass or not. Since the glass was destroyed, I decided to Scotch guard it to protect it from getting dirty.

You could use this same technique for other things besides a sewing machine.

Super cute. I think I am going to make one for my guest/sewing room!

Enjoy and Happy New Year!

Wednesday, December 29, 2010

Hallmark or Not.... Silhouette Ornaments

I give my kids an ornament every Christmas. The plan is that when they get married I pass their ornaments on to them for their tree. I LOVE Hallmark ornaments and try to get them one that fits for that year. Here are a few from years past.

Thomas - the year he was in a band (that practiced in our basement..)

Jocelyn- the year she went on her first prom.

You get the idea. Well, this year I just wasn't crazy about any of the ornaments out there. I wound up buying some but decided to take them back. To go along with Jocelyn's home-made pledge I came up with this idea ~ Silhouette Frames

I had seen something like this in blog-land so at Thanksgiving I tried to get a side view picture of each of my kids. All of Michaels pictures look like so I had to improvise.

Supplies:
  • $1.00 frames from JoAnn's
  • Scrap book paper - patterned and solid black
  • Ribbon - I used black and red
  • Glue gun
Directions:
1. I used ipages, but you can use word, etc. I opened up a new document. I made a 2 1/2" x 3 1/2" box. The I inserted a picture and resized until it fit inside the boxed area with room all around. Once you get the heads the size you need you don't really need the boxes so you can delete them and make more room for more heads. I printed it out.
2. I placed the printed out paper on top of the black paper and cut them out. You need to add the curved neck area. No pattern here I just winged it.
3. I cut out a 2 1/2" x 3 1/2" piece of the patterned scrapbook paper and since I wasn't sure if they might want a different silhouette I just taped the black silhouette on to the paper. I put the frame together.
4. I hot glue the ribbon on the back at the top so you can still open the back up or use the stand.

That's it!
Enjoy!

I like the way they turned out but if I am honest I am still torn about the Hallmark ornaments.
Thankfully my husband, daughter in law and her parents each bought me one so I have three new ones for the tree! :)

Tuesday, December 28, 2010

Cupcake Pincushion

I saw this in a book from the library. I have a friend who has a cupcake making business and who also loves to sew and immediately thought I would make one for her. I wound up making one for my daughter, my daughter in law, and my mom too. It can basically be made all by hand or you can use a machine.

Supplies:
  • Wilton Silicon Cupcake Liner
  • Felt (Brown for chocolate but pink or cream would also work!)
  • Polyfill
  • Sand
  • T-shirt fabric
  • Needle and Thread
  • Fabric glue
  • Red pom-pom (for a Cherry!)
  • Ball pins (for Sprinkles!)
  • Tacky glue
Directions -
1. Cut out one 2" circle from felt.
Cut one long curved piece from felt.
Cut an oval shape from felt and cut a swirl pattern in it. (about 6" x 5")
Cut one circle from knit fabric. (about 4" 3/4)

2. Put curved piece inside the cup and pin to fit. Trim top down.

3. Sew seam. You could also just use fabric glue.

4. Baste around the knit fabric. You can do this by hand or by machine on the longest length.

5. Gather it up till it fits around the top of the 'cupcake'. Sew in place and then turn inside out. It will look sort of like a chef hat.
6. Sew the bottom on but leave an opening.


7. I put a little bit of polyfill in first (I am not sure why...) and then pour in the sand. This is a bit of a challenge but I just kept pushing the sand down so it was packed.

8. Sew the circle closed.
9. Take the oval piece of felt and starting in the center start pinning it down until you get to the end.

It will look like this.

10. Start at the bottom of the 'frosting' sewing the 'frosting' to the top of the cupcake, going around and ending at the top. Then sew pom-pom on.


11. Glue into the Wilton cupcake liner with Tacky glue. Fill with some Ball pins.

All done!

*I just wanted to say that although I saw this in a craft book (I can't remember the name of it!) I did change it quite a bit. For one thing the book said to fill it with just polyfill and that was just too light and wouldn't stand up. Very annoying. The sand definitely makes it more sturdy. The other thing was it had you sew right through the bottom of the cup to attach the cupcake and the liner and I just didn't like the look of it. I changed the actual construction too.


Monday, December 27, 2010

Christmas Jammies

Our family tradition when my children were growing up was that they each got a new pair of pajamas for Christmas. It was the one gift they could open on Christmas Eve. All the pictures of Christmas morning showed my kids in nice, brand new jammies. Well, my kids are grown now. Michael is 27, married for almost 3 years and I figure his pajamas are now his wife's concern. Thomas is 24 and still living at home. To be honest he comes and goes but he hasn't officially moved out yet. And then there is Jocelyn, my 21 year old daughter who is studying Fashion merchandizing at a college four hours away.
This year Jocelyn requested footy pajamas for Christmas. Now, she can still fit into the girls clothes at Target and Target happened to have footy pajamas for $12.98! But... she wanted a pair made by her mom. What is a mom to do? Well, I was going to make her pj's! :)
Guess what? They don't sell footy pajamas patterns anymore. I found a McCalls pattern for pajamas that included pants and an one piece but no feet. I had to try to figure out the feet on my own. I wound up buying a pair from Target to look at. I think I still need to tweak the feet. I am happy to say she loves them. Here they are....

Ok, now I can't make Jocelyn a pair of pajamas and not make a pair for Thomas! Here is the pair I made for him. I made the bottoms out of fleece from JoAnn's and then found a t-shirt at Marshalls. I was going to paint a dinosaur on the front. I found an image on google, printed it out, traced it onto waxed paper and cut it out. Then I tried to iron the paper to the shirt so I could paint it but that did not work. Thankfully Jocelyn was home from school by this point and told me I needed freezer paper. There was no freezer paper to be had so Jocelyn showed me how to make an applique out of an orange t-shirt. I put the right sides of the fabric together, traced the dinosaur on and then sewed all around the edges. Trimmed all around, clipped to the corners, cut a slit in the back and turned right side out. My zig-zag isn't working so I hand sewed on the dinosaur. I really like how they turned out.
Here's hoping you have a warm and cozy day.

Friday, December 24, 2010

Do Not Enter....


My daughter is home from college!! I have her for three weeks. I am so excited but for today this is what I have...


Merry Christmas to all! Enjoy your family, eat some cookies, and remember this..


Holy God in love became

Perfect man to bear my blame

On the cross He took my sin

By His death I live again

Monday, December 20, 2010

Vanilla - Part 2


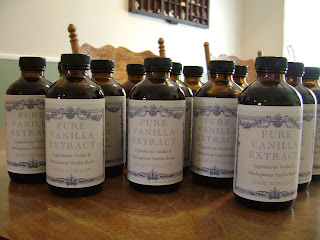
It's done! :) Yeah! It only cooked for about 5 months since I started a little late. I ordered my bottles from Specialty Bottle. I bought the 8 ounce amber bottles. Next year I will try to remember to order the shrink wrap tops so my bottles will look a bit more professional. I found this site The Graphics Fairy in blog land that has free graphics. I found something I liked and doctored it up in iPages. I bought sheets of labels and printed them out.

Now for the hard part.... How am I going to get the vanilla from that huge jar into little 8 ounce bottles? I needed help and everything is more fun with a friend. Enter Enza:)

SUPPLIES:
  • The Vanilla :)
  • Amber bottles - my 5 gallon jar yielded 12, 8 ounce bottles.
  • A large measuring cup.
  • A strainer
  • A coffee filter
  • A funnel
  • Labels
We decided that we needed a container under us to catch any spills so I grabbed a plastic tub.


1. Put the coffee filter into the strainer and then place in measuring cup.
2. Pour the Vanilla into the coffee filter.
3. Pour into the bottles. Dry the outside of the bottles.
4. Place labels on. Not so easy to get it perfect... but close enough.
5. I wrapped the bottles in plastic bags and added a bow.

Then give them all away!

NO WAIT! Keep one or two for yourself and plan on making a new batch in June!
Thanks Enza - for your friendship, laughter and the extra set of hands I needed!

Enjoy!

Friday, December 17, 2010

Wine Cork Chess Set


This might be a crazy idea.... I decided to make a homemade Wine Cork Chess set for my daughter's boyfriend for Christmas.

SUPPLIES:
  • Wood chess board - I found mine at the local thrift store for $2.98.
  • Wine Corks - I bought wine corks on ebay. The man I purchased the corks from was kind enough to make sure I had 16 of the same for the pawns, 4 of the same for the knights, etc. (He probably thought I was crazy for sure! )
  • Wood disks - I bought these at Michaels. You need 32.
  • Acrylic paint - Black, Bordeaux Wine, and I mixed up a tan that matched the cork color.
  • Chess piece graphics - See below.
  • Modge Podge
  • Hot glue gun and glue sticks
First I decided which Wine corks were going to be each piece:

2 Kings - Vignobles Ducourt Wine (it has a crown on it)
2 Queens - High Note (just thought it worked...)
4 Bishops - Bogle (for the B)
4 Knights - Cycles Gladiator (Gladiators are like Knights, right?)
4 Rooks - Rabbit Ridge (for the R)
16 Pawns - Geyser Peak (for the P)


1. I found symbols for the pieces on google images. I figured out the size of the tops of the corks and printed them out on cream colored paper. I cut them all out.
2. I painted the bottom wood disks, 16 Bordeaux Wine and 16 Black.
3. I painted the tops of 16 corks with Bordeaux Wine and 16 with a tan that matched the corks.
4. I hot glued the corks to the wooden disks.
5. I modge podged each symbol onto each piece. I put the black symbols on the corks painted tan with the black wooden disks. I put the cream symbols on the corks painted wine color with the wine colored disks.


To store them I used a wooden box, sort of like a large recipe file box I had in the closet!
That's it! I will let you know what he thinks of his gift after Christmas.
Enjoy!


Friday, December 10, 2010

Twelve Days of Christmas Gift Idea


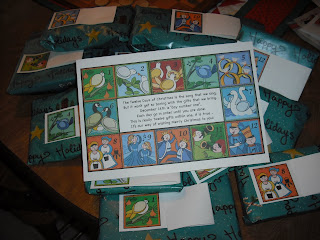
I have a 8 year old nephew who lives in Florida. I don't get to see him often and unfortunately his parents are going through a nasty divorce. I thought instead of sending him a gift card this year I would do something that my brother and nephew could do together. I decided to use the song The Twelve days of Christmas as my theme and started looking for items that would work. I added a note with directions on what day to start. I wrapped each day's gift separately and added a note card I made on the computer. I made the card so I could fold it over so they don't see what the 'poem' says until they open that days gift. I also wrote that days number on the package under the tag incase the tag came off during shipping.
This is what I came up with.

Day 1. A Partridge in a Pear Tree - The Partridge Family DVD (my brother and I were born in the 60's so he will get a big kick out of this!)


Day 2. Two Turtle Doves - Two Dove bars and a cute little wood turtle I found at Michaels.


Day 3. Three French Hens - A gift card to McDonalds to get french fries!


Day 4. Four Calling Birds - I found cute Penguin things at the check out line in JoAnns. An eraser, a notebook, a craft project, and a Penguin push up pop.


Day 5. Five Golden Rings - Ring pops, of course and some gold coins.


Day 6. Six Geese a Laying - (It's getting harder now...) Silly Putty and a gift card to Target.


Day 7. Seven Swans a Swimming - A flashing Rubber Ducky and Bubble Bath. I made sure the note said this one was only for my nephew... :)


Day 8. Eight Maids a Milking - Old Maid Card Game (Toys R Us) and Milk Duds


Day 9. Nine Ladies Dancing - The Nutcracker


Day 10. Ten Lords a Leaping - A Jump Rope and Socks from Target (sorry about the picture)


Day 11. Eleven Pipers Piping - A Bubble pack, and some weird Flarp whistles...


Day 12. Twelve Drummers Drumming - A Chipmunks Christmas CD (terrible picture, sorry)
That's it. I put them all in a box and mailed it so it would get there by the 14th. I will let you know what my nephew thought about it.

Enjoy!

Wednesday, December 8, 2010

Wine Cork Hot Plate


I've mentioned in a previous post about my daughter and her homemade pledge. Well, that got me thinking of gifts I could make for my neighbors. I came up with this idea. The best part? I made it ALL by myself. I even used a CIRCULAR SAW for the first time! That tool scares me, well that and chain saws - there is NO WAY I will ever use one of them. Anyway... This one is a smaller one that is battery operated. My husband says it wouldn't cut my finger off but I think if it is cutting wood I will keep my fingers away. Thank you very much. I also used a compound miter box, but I love that tool~ Ok here goes.

Supplies:
  • Wine Corks - I actually bought them on ebay but if you drink wine and save your corks that is even better!
  • Wood - It's called Craft Plywood. I purchased mine at JoAnns. I bought 1 12"x12" and 1 1"x36".
  • Sandpaper
  • Wood glue and clamps - I used a belt type clamp.
  • Acrylic Paint
  • Wine Corks
  • Glue gun and glue sticks
  • Rubber stick on Bumpers
  • Ribbon to decorate - I found a shadow box set that had ribbon and cute buttons at Michaels.

1. I layed the corks out and measured. For the layout I did it was 7" x 7". I marked my wood and cut it out with the circular saw. Then I cut 2 7" pieces from the 1" x 36" using the compound miter box. The next two pieces need to be longer than the 7" to include the thickness of the wood on both ends. I believe the wood is 1/4" but check before you cut. My 24 year old was giving me advice as I was cutting and having to go back and cut again. "Measure twice, cut once." Thanks Tom. :) Sand down any rough parts where you cut.
2. Using wood glue glue the sides to the bottom. Tricky, but if I did it so can you. Then I carefully put the belt clamp on, tightened it and left it for a few hours.
3. Next I painted it. I used Bordeaux Wine - I thought it appropriate. The bottom doesn't have be painted great because it will be covered with the corks.

4. Once dried I hot glued the wine corks inside.

5. Place bumpers on each corner on the bottom.
6. Decorate sides with ribbon.

Neat gift idea for those friends and family who enjoy wine~ Enjoy!

Monday, December 6, 2010

Easy Damask Picture Frames


I saw these frames here and knew I had to make one or a dozen or more, which is what I've done. They are inexpensive, look great, and are incredibly easy to make.
Supplies:
Wood frames - Michaels $.99 a piece
Black acrylic paint
Scrapbook paper - Michaels
Modge Podge
Wide paint brush
A very sharp exact-o knife
A Brayer
Fabric Flowers - find out how to make them here

1. Paint the back, the outsides and the inside where your picture will go. You don't have to paint the front since it will just be covered with paper. Let dry.
2. Trace the frame onto the scrapbook paper. I like to lay the frame right side up on the right side of the paper and trace around. On the back I right an arrow so I know which way is up. I've found a couple of frames were not exactly the same size so the paper didn't line up perfectly. Well, as perfect as I can get it. Then I cut the center out. I try to cut inside my pencil line so I don't have much to trim later.
3. Next comes Modge Podge! Using a wide brush cover the entire top of the wood frame then cover the back of the paper. Line up and place paper on top of wood. Once lined up use a brayer to get all the bubbles out and get it nice and flat. Then I let them dry for a while.
4. After it sits for a little while I take the exact-0 knife and trim any extra paper hanging over the edges. Make sure your knife is really sharp and work slowly so you tear the paper.
5. Now Modge Podge the top, the outsides, and the inside. Let dry.

6. Hot glue fabric flower in corner.

7. Use a word processing program to make 'signs' to go inside. Here is a list of the friend sayings I came up with ~
  • A friend is someone who reaches for your hand and touches your heart.
  • May God give you... For every storm, a rainbow. For every tear, a smile. For every care, a promise and a blessing in each trial. For every problem life sends, a faithful friend to share. For every sigh, a sweet song and an answer for each prayer. An Irish prayer
  • May the friendships you make, Be those which endure, And all of your grey clouds be small ones for sure. And trusting in Him to whom we all pray, May a song fill your heart, every step of the way.
  • A true friend... warms you with her presence, trusts you with her secrets, remembers you in her prayers.
  • A friend loves at all times...
  • A friend will strengthen you with her prayers, bless you with her love, and encourage you with her hope.
  • Friendship isn't about whom you have known the longest... It's about who came, and never left your side...
  • A true friend is a gift from God...
  • You know you've got the greatest friends when the only time they make you cry is when you're laughing too hard...
  • Friends are like a good bra, supportive, hard to find, and always close to your heart!
  • Side by side or miles apart, friends are forever close to your heart!
And a few for moms~
  • My mom is a never ending song in my heart of comfort, happiness, and love. I may sometimes forget the words but I always remember the tune.
  • Your arms were always open when I needed a hug. Your heart understood when I needed a friend. Your gentle eyes were stern when I needed a lesson. Your strength and love has guided me and gave me wings to fly.
And a few for my daughter in law~
  • Daughters are angels sent from above. To fill our heart with unending love.
  • dance - as though no one is watching you. love - as though you have never been hurt before. sing - as though no one can hear you. live - as though heaven in on earth.
Enjoy!